
By ToolBrivio Editorial · Routing tested in OBS Studio 30.2.3 on Debian Linux, October 14, 2026, with generated test tones; real microphone and desktop capture not tested. These are ordinary source links, and ToolBrivio currently earns no affiliate commission from them. Research approach · Disclosure.
Keep one complete mix and two editing tracks
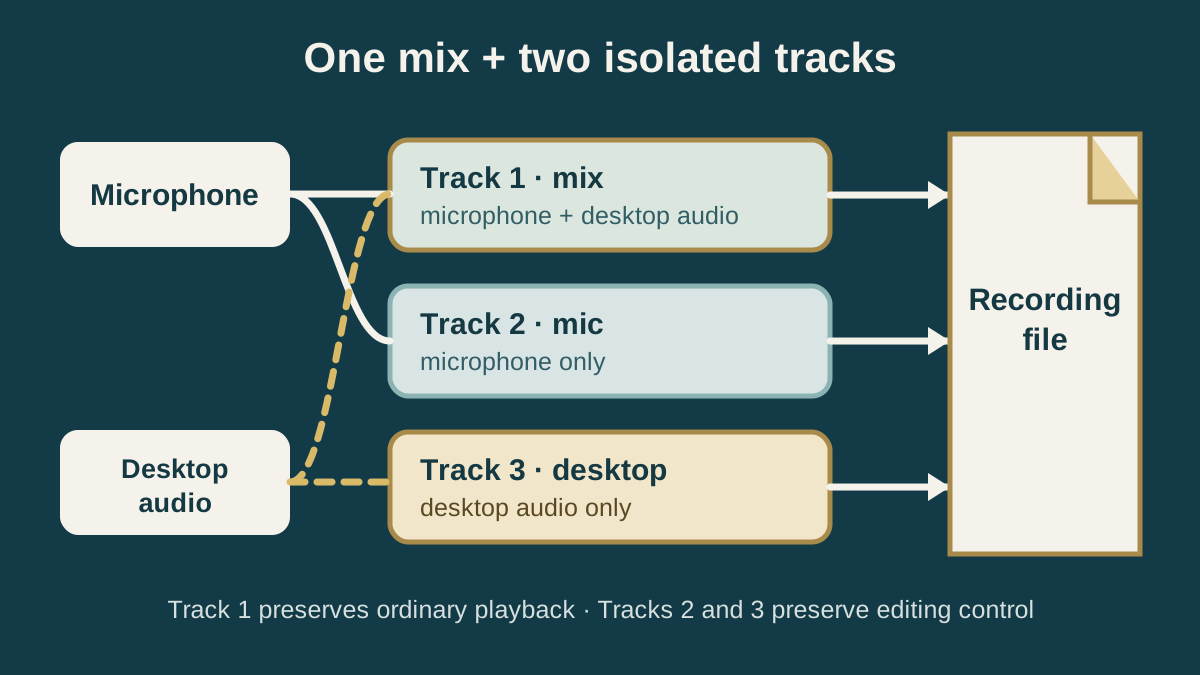
Send microphone and desktop audio to Track 1, microphone alone to Track 2, and desktop audio alone to Track 3. Then make a short test and inspect every track in an editor before the real session.
You finish a screen tutorial and discover that a notification is louder than the explanation. If microphone and desktop audio exist only in one mixed track, lowering the notification also lowers the voice. Isolated tracks give an editor another option—but only if the file also has a dependable mix and every route is verified.
OBS supports recording tracks 1 through 6 in Advanced Output mode. This example uses three because each has a clear job. Standard players generally play one audio track rather than mixing all of them, so Track 1 remains the complete reference mix.
Test note: On October 14, 2026 we set up this three-track route in OBS Studio 30.2.3 on Debian Linux and made a 10-second 1280x720, 30 fps MKV recording. The two generated test tones (440 Hz and 880 Hz), played by OBS media sources, stood in for the microphone and desktop audio because the test machine had no audio devices. A real microphone and real desktop audio capture were not tested. The 440 Hz tone was routed like the microphone (Tracks 1 and 2), and the 880 Hz tone like desktop audio (Tracks 1 and 3). We checked the tracks with ffprobe and ffmpeg. We did not do editor imports, level and clipping checks, or the spoken three-part test below. Those steps are based on OBS documentation. Labels can change between versions and platforms.
What the test recording contained
- Three audio streams: ffprobe listed H.264 video plus three AAC LC 48 kHz stereo streams titled
Track1,Track2andTrack3, each about 10.0 s long. - Track 1: Both tones at equal level, giving the full mix.
- Track 2: The 440 Hz tone only. The 880 Hz tone was about 127 dB lower, so it was effectively absent.
- Track 3: The 880 Hz tone only. The 440 Hz tone was about 112 dB lower.
Each source landed only on the tracks ticked for it in the matrix, with no bleed into the others.
Watch out after remuxing to MP4
In our OBS 30.2.3 test on Linux:
- Track titles were dropped. After OBS remuxed the file to MP4, all three tracks were still there with unchanged content, but the
Track1/Track2/Track3titles were gone. Keep your track map in a text note. - Only the first audio track was marked default. A player that follows the default flag starts on Track 1, so keep Track 1 as the full mix.
- Reported duration differed slightly. ffprobe reported 10.10 s for the MKV and 10.07 s for the MP4, a 0.03 s difference with identical streams.
Decide the handoff before opening settings
Write down what the next person needs. For a narrated screen recording, that may be a video they can preview immediately plus isolated voice and desktop audio for balancing.
| Track | Contains | Purpose |
|---|---|---|
| 1 | Microphone + desktop | Complete listening mix and fallback |
| 2 | Microphone only | Voice cleanup and level changes |
| 3 | Desktop only | App sounds, music or demonstration audio |
Tracks 2 and 3 are intentionally incomplete. Add more tracks only when the editor has a reason to receive them. A six-track file with no route notes can be harder to verify than a three-track file with clear names.
1. Add and identify both audio sources
Create the scene you will record, then confirm that OBS has the intended microphone and desktop-audio source. Depending on the platform and setup, audio may come from global device settings or scene sources. The Audio Mixer should show a distinct meter for the microphone and for the desktop signal you intend to capture.
Speak at your real level, then play representative desktop audio. Look for activity on the expected meter and silence on anything you did not intend to capture. If two meters respond to the same microphone, investigate a duplicate route before continuing.
Use unambiguous source names. “USB mic” and “Desktop demo” make the routing matrix easier to audit than “Audio Input Capture 2.”
2. Switch recording output to Advanced
Open Settings → Output and change Output Mode to Advanced. In the Recording section, enable Tracks 1, 2 and 3. Leave unused tracks disabled for this example. Enabling a track makes it available to the file; it does not decide which sources appear on that track.
In OBS 30.2.3 these controls are on the Recording tab under Output. The format is listed as Matroska Video (.mkv), and the tracks are the Audio Track checkboxes 1–6.
Choose MKV as the recording format. The official output guide recommends MKV because an interrupted session is less likely to leave the whole recording unusable than formats that require finalization at the end. If the editor expects MP4, remux after a clean stop.
Also confirm the recording path and free storage. Separate tracks can increase file size.
3. Assign sources in Advanced Audio Properties
In the Audio Mixer, open Advanced Audio Properties (in OBS 30.2.3, it is the gear button below the mixer). Each source gets a row of Tracks checkboxes 1–6. Set the source-to-track matrix like this:
| Source | Track 1 | Track 2 | Track 3 |
|---|---|---|---|
| Microphone | On | On | Off |
| Desktop audio | On | Off | On |
The microphone feeds the complete mix and its isolated voice track. Desktop audio feeds the complete mix and its isolated desktop track. Do not enable both sources on every track, which would create three similar mixes. Do not remove either source from Track 1 in this example; an incomplete Track 1 can make a correct multitrack file sound broken in an ordinary player.
If your version exposes track names, use concise labels such as Full mix, Mic and Desktop. Record the mapping in the delivery note even if labels do not survive every container or editor.
4. Make a three-part test recording
- Say “microphone only” while desktop audio is silent.
- Play a recognizable desktop sound while you remain silent.
- Speak while the desktop sound plays quietly underneath.
Stop and locate the file. First play it in an ordinary video player. Track 1 should contain all three parts. Next, open it in an editor or media tool that exposes individual audio tracks. Track 2 should contain the first and third microphone passages but not the desktop-only sound. Track 3 should contain the second and third desktop passages but not the microphone-only statement.
| Observed result | What to inspect |
|---|---|
| Track 1 has only the microphone | Desktop source may be absent from Track 1 or not captured |
| Track 2 also contains desktop audio | Desktop source may be enabled on Track 2 |
| Track 3 also contains the microphone | Microphone may be enabled on Track 3 |
| Ordinary player sounds incomplete, editor tracks look correct | The player may have selected an isolated track or handled the container differently |
These are diagnostic prompts, not proof of one cause. Reopen the matrix and source settings, correct one issue, then create another short test.
5. Check levels without losing the safety route
Routing and level are separate decisions. Isolation lets an editor balance microphone and desktop later, but a severely distorted microphone cannot be repaired by moving it to another track. Test at the loudest expected speech and desktop level.
Keep Track 1 useful as a reference. If desktop audio overwhelms the microphone there, isolated tracks may permit a better edit, but the fast preview and fallback mix remain poor. Also listen for notifications, another app, microphone monitoring or duplicate audio. Separate tracks preserve routing mistakes as faithfully as planned signals.
6. Remux only after the MKV is complete
Use OBS’s remux function if the destination requires MP4. Remuxing changes the container; it is not an editing or quality-improvement step. Keep the original MKV until the editor confirms that the new file opens with the expected picture and tracks. In our test, OBS’s remux kept all three tracks without re-encoding them.
- Track 1 plays as the complete mix.
- Track 2 contains microphone and excludes desktop audio.
- Track 3 contains desktop audio and excludes microphone.
- The beginning, end and expected duration are present.
- The recipient’s editor can expose the tracks.
For the exact conversion controls and destination checks, follow our MKV-to-MP4 remux guide.
Hand off a route map, not just a video
Put the recording and a short text note in the delivery folder. Identify the OBS version, original and remuxed filenames, track mapping, expected duration and verification status. If the editor requests separate audio files rather than tracks inside a video container, agree on an export or different capture route; a multitrack container does not satisfy every ingest system.
For transcription, decide whether the service should receive the complete mix or one isolated track. A clean microphone track can help when desktop sounds are irrelevant, but it is incomplete if another participant exists only in call audio. Listen to the whole route before choosing. Our interview recording preflight explains that decision more broadly.
Download the OBS three-track handoff checklist (TXT)